Showing posts with label DIY and Handmade. Show all posts

November 25, 2019

Baby Yoda Plush Dolls!!!


Baby Yoda rules the internet and our hearts. I fell head over heels for him like everyone else, so of course, I made him into a doll.


My doll has been more popular than I anticipated. I'm happily swimming in orders, and the first batch is going out tomorrow. Thank you for loving him!

Buy on Etsy: https://www.etsy.com/listing/756057408/green-alien-baby-yoda-plush-doll

Buy directly through PayPal: https://www.paypal.me/planetgloomdolls

-Mandy

October 4, 2018

DIY Glow-in-the-Dark Alien Necklace


My junior high days have come back to haunt me. Mini backpacks, plaid skirts, scrunchies, chokers, and overalls are everywhere. Admittedly, I'm happy about some of those things. But what makes me the happiest is seeing alien-themed items.


1.  You'll need a guitar pick, glow-in-the-dark spray, a Sharpie, a pencil, pliers, sealant spray, ball chain, a jump ring, and a metal hole punch. Optional items are a hammer, a nail, suede cord, a lobster claw, a jump ring, two small jump rings, and two end crimps.
2.  Punch or use a hammer and nail to create a hole in the guitar pick.
3.  Sketch oval eyes on the guitar pick.
4.  Spray the guitar pick with glow-in-the-dark spray. Allow the paint to dry for 15 minutes and spray another coat. Allow to dry for an hour.
5.  Trace and fill in the eye outline with a Sharpie.
6.  Spray the pick with sealant. Allow 15 minutes between coats. Allow to dry for an hour after the last coat.
7.  Attach the jump ring to the guitar pick.
8.  Optional: Use suede cord, end crimps, a jump ring, small jump rings, and a lobster claw to make a necklace.
9.  Slide alien pendant onto necklace.

-Mandy

August 1, 2018

DIY Flamingo Headband


It's been a while! This project is the first post in five months. As of tomorrow, this site will go back to its original address of www.mandycrandell.blogspot.com. The reason? Life changes... especially in nine years since creating this blog. Projects, jewelry, and roadside adventures will still be posted, just less frequently.

Now, onto the project.


1.  You'll need a template, headband, pink felt, black felt, pipe cleaners, large pom pom, needle, black thread, pink thread, scissors, hot glue gun, hot glue sticks, white fabric paint, and black fabric paint. (The headband and pom pom pencil came from the dollar store.)
2.  Cut out two circles from pink felt.
3.  Cut out two head and two beak pieces.
4.  Hot glue the beak pieces to the head pieces.
5.  Use black thread to sew the beak pieces together.
6.  Cut out three feather pieces.
7.  Use pink thread to stitch the head pieces together. Insert the pipe cleaner before stitching shut.
8.  Stitch the head to the pom pom.
9.  Glue one of the circle pieces to the underside of the headband. Glue the other circle to the topside of the headband over the other piece.
10.  Glue the three feather pieces to the top circle.
11.  Glue the pom pom to the top circle piece.
12.  Use the fabric paint to add closed eyes and white beak details.

-Mandy

February 28, 2018

X-Files Mulder + Scully Dolls


A custom request.

-Mandy

December 13, 2017

October 30, 2017

DIY Day of the Dead Wreath


Day of the Dead is celebrated from October 31 to November 2, but I think sugar skulls should be displayed all year round.


To make this wreath:
You'll need a foam wreath form, various colors of felt, fabric paint, scissors, this pattern, a hot glue gun, and hot glue sticks. The felt skulls I used came from Target, but I scanned one to create the pattern.


1.  Cut black felt into strips.
2.  Wrap strips around wreath form hot gluing as you go.
3.  The entire wreath should be covered with felt.
4.  Take a strip and glue along the edge. Fold it in half the long way.  Form a loop and glue the ends together.
5.  Glue the loop to the back of the wreath.
6.  Cut out the skull piece using white felt. Use fabric paint to create the eyes, nose, and mouth. Let dry. You can also cut those areas out of the skull and glue the piece to black piece of felt.
7.  Glue the skull to the wreath.
8.  Cut out eight bone pieces. Glue two of them together to form a flower.
9.  Cut out four or more leaf pieces. Glue one to the back of the bone flower. Repeat steps 8 and 9 for the other bone flowers.
10.  Cut out the spiral flower pieces.
11.  Begin at one end and roll the spiral hot gluing as you go. Repeat this step four more times.
12.  You should now have a rose.
13.  Glue the roses to the bone flowers.
14.  Glue the flowers to the wreath.
15.  Use fabric paint to decorate the skull.

-Mandy

October 23, 2017

DIY Voodoo Doll Costume


The oldest decided to be a voodoo doll for Halloween this year.


To create your own costume:
You'll need black and red felt, scissors, black pipe cleaners, large pom poms, a hot glue gun, glue sticks, a needle, black thread, a tan dress, and an exacto knife (optional).


1.  Fold a piece of red felt in half and cut a teardrop shape.
2.  Unfold piece to a heart shape. Trim if necessary.
3.  Cut out a second heart shape.
4.  Use an exacto knife or scissors to make a small slit in one of the heart pieces.
5.  Make another slit or two.
6.  Cut pipe cleaners in half.
7.  Glue pom poms to one end of the pipe cleaners to create "pins".
8.  Slide the pins into the slits.
9.  Lay the other heart shape under the slit one. Glue the pins to the bottom heart.
10.  Glue the heart pieces together.
11.  Your heart piece is complete.
12.  Cut "stitches" out of black felt.

Use black thread to stitch the heart and stitches to the tan dress. Use makeup to add stitches to your face.

-Mandy

October 16, 2017

DIY Voodoo Doll


The oldest is dressing as a voodoo doll for Halloween, and I made a doll to go along with her costume.


Download the pattern here.  Print the file at actual size.


1. You'll need tan felt, red felt, a button, needle, black thread, craft wire, pliers, wire cutters, beads, scissors, black fabric paint, polyfil (not pictured), and the pattern.

2.  Print out the pattern. Cut out the pattern pieces and use them to cut out the fabric pieces.

3.  Sew the button onto one of the head pieces.

4.  Cut off a piece of craft wire and make a tiny bend about .75" from one end.

5.  Slide a bead onto the wire and curl the end.

6.  Bend the wire to make a v shape. Poke it through the heart piece in two places.

7.  Make a tiny bend at the other end of the wire.  Repeat Step 5.

8.  Sew the heart onto one of the body pieces.

9.  Stitch the two body pieces together and stuff with polyfil. The more haphazard the stitching, the better. Stitch two leg pieces together and stuff.  Sew the leg to the body. Do the same with the remaining leg, arms, and head. Finish by adding stitches with fabric paint.


I'll be posting a separate tutorial for the voodoo doll costume.

-Mandy 

October 4, 2017

Ocean Hair Pins


A new mermaid shirt required new hair pins.  

You'll need:
- two bobby pins
- felt
- fabric scissors
- hot glue gun and glue sticks
- fabric paint

These hair pins don't take long at all.  The fabric paint will dry quickly as long as the dots aren't too thick.

-Mandy


September 25, 2017

No-Sew Dino Skull Purse


I took the purse idea from the oldest and made a dinosaur version for myself.  The chain is made out of a thick link bracelet chain.

-Mandy

May 15, 2017

Björk Doll


Björk in her unforgettable swan dress from the 2001 Academy Awards.

If you're interested in any of my dolls, please email me at something_monumental@yahoo.com.

-Mandy

January 19, 2016

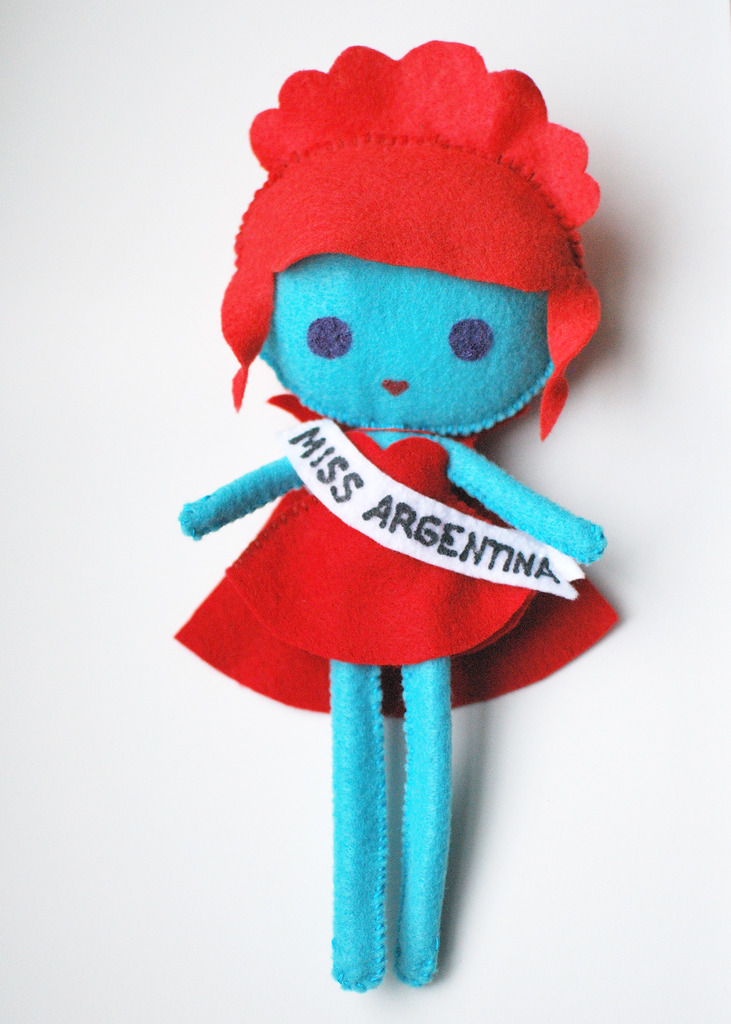
Miss Argentina Doll


A Miss Argentina to go along with my Lydia Deetz doll.

If you're interested in any of my dolls, please email me at something_monumental@yahoo.com.

-Mandy

July 6, 2015

Plush Loch Ness Monster


Nessie might be the greatest thing I've ever brought to life (in my dinosaur-obsessed opinion).  He's made of green fleece rather than felt.  I'm definitely considering listing him in the shop.

If you're interested in one email me at something_monumental@yahoo.com.

-Mandy

June 23, 2015

DIY Star Wars Fabric Converse


I couldn't bear parting with my old pair of navy Converse.  Instead, I upcycled them using my brother's old Star Wars sheets.


This project is an updated version of my Map Shoes.

You'll need fabric, a pair of shoes, Fabric Mod Podge, scissors, an exacto knife, and a paintbrush.


1.  Begin by removing the laces and coating one side of the shoe with Fabric Mod Podge.
2.  Cut out a piece of fabric and lay it onto the coated shoe.  Rub the fabric so that it sticks to the shoe.
3.  Using scissors, cut along the top silhouette of the shoe.
4.  Using the exacto, press the fabric into the tight corners along the shoe.  You may need to do this a few times.  Allow to dry.
5.  Once dry, trim all excess fabric.
6.  Seal the edges of the fabric with Mod Podge.  Allow to dry.
7.  Using the exacto, puncture holes through the fabric covering the eyelets.
8.  Repeat steps 1 thru 7 on the other side, then on the other shoe.
9.  Relace both shoes, and you're finished!

If using Converse sneakers, you may choose to cover the tongue and heel with fabric.  I didn't since the fabric used was similar in color to the shoe.

-Mandy

October 21, 2014

DIY Boot Covers


For about $10, you can make a pair of boot covers for your Halloween or cosplay outfit.  These are children's boots, and it only cost me half of that.

You'll need felt, velcro, scissors, fabric glue, elastic, needle, thread, a white pencil, and a pair of boots.  The template is your boot, and the white pencil is used to outline where you want to cut.  The two boots pieces can be glued together.  It's best to sew them if the cover is for a child since they will more likely fidget with them.

-Mandy

August 26, 2014

Queen of Hearts Bow Necklace


Here's a fun craft for the Alice in Wonderland/card game fans.


1.  You'll need a playing card, washi tape, a small hole punch, scissors, pliers, chain, and jewelry findings.  You can always switch out the chain and jewelry findings for string.
2.  Begin by folding a playing card along the long edge of the card.
3.  Now fold the card backward.  Repeat steps 2 and 3 to the other edge of the card.
4.  Your card should now have an accordion fold.
5.  Find the middle of the folded card and press down with your fingers.
6.  Cut off a piece of washi tape and wrap it around the middle.
7.  Fan out the folded ends.
8.  You should now have a bow.
9.  Punch a hole in the top two corners of the bow.
10.  Attach a small jump ring and chain (to your desired length) to one of the holes.  Repeat on the other side.
11.  Find the middle of the chain and pull it apart.  Attach jump rings and a clasp.
12.  Your necklace is ready to wear.

-Mandy

August 27, 2013

DIY Front/Back Stud Earrings


Have you ever worn front/back earrings?  I always thought they were cute but never found a pair that I liked.


1.  You'll need tiny toys/erasers, blank earrings studs, an exacto knife, and jewelry glue.  I found my dinosaurs on Amazon.
2.  Cut your toy in half.
3.  Glue the posts to the front half of the toy.  Allow to dry.
4.  Carve out a bowl shape into the back ends of the toy.  Make sure the earrings back fits inside of the curve.
5.  Squeeze some glue into the inside of the bowl shape and press in the earring back.  Allow to dry.
6.  Once the glue is completely dry, connect the earring together.

-Mandy

May 7, 2013

DIY Rockabilly Headband


Do you have trouble finding headbands that stay on your head?  When I do find them, they usually dig into my head causing a headache later.  So, what's the solution?  A wire headband.


1.  You'll need a yard of fabric, scissors, measuring tape, craft wire, wire cutters (scissors work too), a needle, thread, and Fray Check (optional).
2.  Measure your head.  Mine was 21".  I added an extra 8" for twisting.
3.  Measure and cut out the length of your fabric.
4.  Now cut that piece to 6" wide.  This made my piece of fabric 29" x 6".
5.  Fold your fabric in half (3" wide) and make sure that the 'bad' side is facing out.  Cut a pointed tip at each end of the fabric.
6.  Sew your piece inside out either by hand or with a machine.  I chose to do a whip stitch.  Be sure not to sew the piece shut.
7.  Push your fabric through the open end to turn the fabric right side out.
8.  Measure a piece of  wire that is 1" longer than the length of your head measurement + the added 8".  Bend the wire at each end to make a loop.  This will prevent the wire from breaking through the material.
9.  Insert the wire into the fabric.
10.  Finish sewing the open end of the piece.
11.  Wrap your headband around your head and twist!

I seriously love these.  I've made two so far, and a third is on its way.

-Mandy

March 5, 2013

DIY Photo Candles


Here's a fun project that makes a great gift for friends and family.


1.  You'll need wax paper, a pieces of cardstock, white tissue paper, scissors, a hair dryer, a printer, tape, and candles.
2.  Take a piece of cardstock and tape a piece of tissue paper to it.  Keep the tissue paper taut so that it doesn't jam in the printer.
3.  In your photo editing program, size your images to fit on the candles and print.
4.  Cut out your images.  Leave a small border all the way around.
5.  Place your image on a candle and wrap a piece of wax paper around the image and candle.  Make sure that the waxy side faces the image.  Turn the hair dryer on its highest setting.  The image will start to turn darker, and you may notice some wax "sweat".
6.  Once the entire image is dark, peel away the wax paper.  You now have a unique photo candle!

Be very careful when blow drying the candle.  Your hands might get hot.

-Mandy

September 17, 2012

Wish Upon a Star


A glass oval filled with wishes.  Maybe one day everyone's will be granted.

-Mandy